December 10, 2011

Sugarpill haul!


Sugarpill is a brand I've been wanting to try forever, so when the site was having a Black Friday sale, I couldn't pass it up! Since I'm on a budget, only two shadows ended up in my order: Buttercupcake, which is described as "the brightest bright matte yellow with awesome opaque coverage"; and Starling, which is described as "vibrant metallic turquoise with intense sheen."


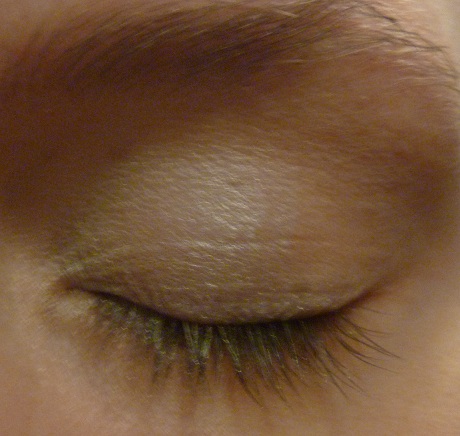
Buttercupcake is one of Sugarpill's nine pressed eyeshadows, and truthfully I had been lusting after it for quite some time.  Thankfully, I am not disappointed in any way! First of all, the packaging is awesome.  It feels really sturdy and looks high-quality.  Personally, I think the packaging is on-par with the quality of higher-end brands.


  As for the shadow itself, it applied really smoothly, and the pigment in it is pretty intense. The swatch you see below (as with all of my swatches, unless stated otherwise) is without any sort of base.
Buttercupcake- natural light

Buttercupcake- indoor lighting

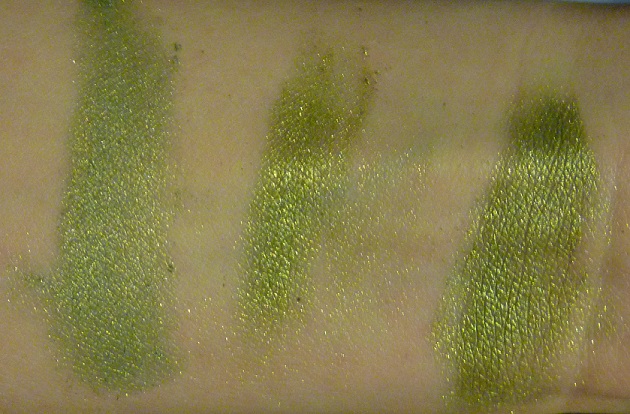
Starling is one of the eighteen (and growing!) Chromalust loose eyeshadows.  The packaging was smaller than what I had expected since I'm used to the KvD pigment containers. However, there is a full .5g of product in the container so it's just wider than it is tall. There isn't a sifter inside the container, which is a tiny bummer for me because I'm very accident-prone and always end up knocking everything everywhere. I guess I'm just going to have to glue this down somewhere!


The color of this shadow is gorgeous-- a metallic medium blue with a teal sparkle. I had ordered Starling for two reasons: 1. the color combo on the eyes of the girl in the Sugarpill illustration was awesome 2. I thought I didn't have anything quite like this in my collection and when I ordered it, I wasn't at home to check. Unfortunately I was wrong. It's pretty much a dupe for KvD's Bukowski shadow from the Angeles palette (or vice versa-- I think Starling came out first). The differences are that Starling has a sparkly, more metallic finish and has much better pigmentation.
Starling- taken in sunlight  L: swatched dry R: swatched wet

Starling- taken in indoor lighting L: Swatched dry R: Swatched  wet)

In my order, I recieved a sample of a loose shadow, Goldilux, which was awesome because I had been on the fence about buying it!
Goldilux is a metallic gold with gold glitter. The pigmentation is amazing, and the glitter actually stuck to my arm when I swatched it!  If you've read any of my reviews of KvD eyeshadows that involve glitter, you can imagine how impressed I was with this! I was on the fence about buying this because I felt I had enough gold shadows. Um, apparently not:
Goldilux, taken with indoor lighting
Swatching is believing!

I've seen a few Sugarpill reviews saying that it's "expensive" which now boggles my mind. Given the overall high quality of the products, I'd say $12 a pop (both the pressed  and loose shadows are this price) is pretty amazing. Honestly, I wouldn't bat an eye if these were $18-$20 a pop because the quality is just that spectacular.  This definitely will not be my last purchase from the brand!

You don't have to take my word for it.  Check Sugarpill out for yourself at Sugarpillsop.com


December 8, 2011

Holiday look 2: Blue and silver smoky eye

Hello!  Here's another holiday look that's NOT a gold eye with a red lip!  This was inspired by the blue and silver that's associated with Hanukkah at this time of the year. I used a coral blush and lip for a bit of a contrast, but this will look great with pink and berry tones.

Before I put the color on, I applied my face makeup and put primer on my eyes.

Eyes
Step 1: Apply a blue shadow to your lid,


  and halfway across your lower lash line.

Step 2: Apply a medium silver shadow to the crease, blending it slightly into the blue.

Step 3: Apply a gunmetal shadow to deepen the outer corner of your eye. I also applied it about half way across my upper lash line.

Step 4 & 5: Add highlights to the inner corner and brow bone, blending the surrounding shadows together. Then I filled in my brows a bit. I just dyed them yesterday, so I didn't go as crazy as I normally do.

Step 6 + 7: Line your upper and lower waterlines with black eyeliner-- I also traced the pencil 3/4 of the way across my top lash line and diffused it a little bit. Then I put on a thickening mascara.  Feel free to put on false lashes for an ULTRAGLAM look!

Lips: Just swipe on a coral lipstick and add gloss to the center of your lips. Super easy!

The final product:

What I used:
Eyes
all products are Kat Von D except where noted otherwise
*Speed Blue e/s
*Razor Gray e/s
*Lucifer (on brows)
*Holy Bible e/s
*Puro Amor autograph pencil
*Sin-full mascara
*Urban Decay Gunmetal e/s
*Urban Decay Primer Potion

Face:
*KvD Rehab Priming elixir
*KvD tattoo concealer in Light and Porcelain
*L'Oreal True Match foundation
*Benefit Coralista blush
*Make Up Forever HD Powder

Lips
*KvD Painted Love Lipstick in Coral Castle
*Smashbox Lip Enhancing gloss in Pout

What kind of look do you go for during the holiday season?

December 6, 2011

Holiday look: Green and Silver

(Since the winter holidays are nearing, holiday makeup tutorials have been popping up everywhere.  Almost every one I've seen has involved a shiny or sparkly gold eye/red lip combination! While gold and red does make a lovely combination, it's not the only one out  that reads "Holiday." 

Note: before I started, I applied my foundation and concealer. Normally I use Urban Decay's Primer Potion before I put on my eye shadow, but today I used Cover FX cream foundation to experiment.  More on that later.


Step one: Apply pale silver eye shadow from inner corner to the middle of your eye.

Step two: Apply dark green eye shadow at lash line and in outer corner, and blending it out a bit.

Step three and four: Apply mid toned green adjacent to the dark green and in the crease, then blend blend blend! If you find that you want to make the look a little darker, you can add more of the dark green eye shadow. Then take a highlighting shade (I used a white/green duochrome, but you can use the pale silver color from Step one), and apply to the inner corner/tear duct area and on the brow bone, blending it into the green shadows.

The rest: From here you can easily turn this into a smokey eye with either a black or dark green pencil liner. My personal look of choice today was winged eyeliner. After my eyeliner, I applied a thickening mascara, then a lengthening mascara.


Lips: I put on lipgloss first, and then my lipstick.  I find this makes the color of the lipstick sheerer, and it doesn't mess up my lipgloss applicator!

Finished look:


What I used:
Eyes
(The following is all by Kat Von D, except where noted)
-Lucifer e/s (matte black) used on brows
-Holy Bible e/s (pale silver)
-Gunner e/s (dark green with green glitter) *
-Ego Sum e/s (shimmering medium bright green)*
-Hawkwind e/s (shimmery white with green flash)*
-Autograph pencil Puro Amor (black)- used to tightline
-Autograph eyeliner in Puro Amor (matte black) This is my liquid eyeliner of choice!
-Sin-full mascara
-Urban Decay Lush Lash Mascara
*These shadows are from the limited edition Gypsy palette.


Lips
-Smashbox Lip Enhancing Lipgloss in Pout (candy pink with subtle shimmer)
-Urban Decay Lipstick in Rush (sheer glossy mauvey-pink)

Face
-L'Oreal True Match Foundation (not a huge fan of this)
-CoverFX cream foundation (used as concealer) (not a huge fan of this either)
-Tarina Tarantino Pearl Glow primer
-MAC Pink Swoon blush
-Urban Decay Razor sharp defining powder

So there you have it! A silver-green eye with a pale pink lip.Now that I think about it, this is reading a bit mod, and it's making me want to put my hair in a beehive! Anyway, this is one of those looks that can definitely be tailor-made to suit your style. (want something more subtle? How about a wash of silver over your eye paired with some green eyeliner? Stronger? How about keeping a smudgey black around the eye,k and then using greens to blend it out?)

. If you liked this look, please stay tuned! I've got more holiday-inspired looks coming up!.

What's your favorite look of this season? Let me know in the comments!


November 29, 2011

Review: Benetint Balm


Benetint balm is a gel balm from Benefit's Benetint family. Unlike the original Benetint, this isn't much of a stain, rather it's a sheer rosy blush.  It's moisturizing, but I wouldn't count on this to restore incredibly dry, flaky lips. The texture is very light, and while it's glossy, it's not sticky. It's also got some built in sun protection- SPF 15.

Left: Benetint balm as is. Right: Benetint balm evened out, as you'd apply it to your lips.

This is rose scented. I've got a sensitive sniffer, and didn't find the scent terribly unpleasant.  It did fade within a few minutes.


The packaging is a pretty straightforward screwtop tub and houses 0.23 g of product. I personally prefer packaging with applicators because it makes applying on the go much easier (and sanitary), so this definitely isn't ideal.

Overall, I don't think all of the elements of the Benetint balm make it worthy of a re-purchase for me. That's BEFORE considering its $20 pricetag!

You don't have to take my word for it. It's available now at Sephora.

November 28, 2011

Review: Urban Decay Lush Lash mascara


Urban Decay's Lush Lash mascara is a lengthening mascara infused with a lash growth serum. I don't use it every day, so I can't really attest to the effectiveness of the serum, but this does its promise of lengthening lashes. This also works well if you layer mascaras-- I sometimes use this in conjunction with my KvD mascara to add more length to the volume that mascara offers.

The brush is unique to any mascara I've ever tried.  It has these hard spikes that are excellent at really defining the hairs and eliminating clumps, but they're very uncomfortable if you get them super close to your lash line.


Before

After!

All in all, I really like Lush Lash.  Even though I prefer curling mascaras, it's a great no-fuss product that is very welcome in my makeup collection. Once this runs out, I'll  definitely be re-purchasing.

You don't have to take my word for it.  It's available now at Sephora.

Review: Kat von D True Romance palette --Saint


Kat Von D's Saint palette is the first palette of all neutral shadows from her line.  Like all of her palettes, it comes with the standard eight shadows, and like the other new palettes that came out this fall, it comes with an eyeliner and a sample of the High Voltage Eye Primer.

I hesitated to pick this up when it came out in September because I thought it would be too similar to Urban Decay's Naked palette and/or some of the pigments I have from the brand (namely Rapture, a metallic peach with a golden shimmer). The only color that proved to be similar enough to something I already have is luckily something I really love. Also, I never really look at the weights of shadows, but the eight shadows in the Saint Palette are 1.4g a piece, vs Urban Decay's 1.3g. Sure, this has 8 shadows vs the Naked Palette's 12, but this costs $13 less. Even though the colors in this aren't really like those in the Naked palette, if that $48 price tag hurts your wallet, this may quell your hunger for a neutral palette.


L-R: Heavens, Enjoy the Silence, <3, Downtown

Heavens: Frosted cream. This came out slightly sheer, but I LOVE this as a highlight color, so I'm not mad.
Enjoy the Silence: Frosted pale pinkish champagne
<3: Matte pastel pink with multicolored glitter. As you can see in the swatch, the glitter didn't stick at all!
Downtown: Metallic bronze-y peach (previously appeared in the Ludwig palette)

L-R: Sunny, Pray for Me, Bookworm, Caravaggio


Sunny: Metallic dirty gold. This is very similar to Urban Decay's Half Baked, which leans more yellow.
Pray for Me: Warm brown with dirty gold shimmer. I was a bit disappointed with how sheer this was
Bookworm: Matte brown with gold sparkle. I thought this was similar to Urban Decay's Darkhorse, but this has more of a red tone and doesn't have a metallic finish.
Caravaggio: Greyed matte brown


Puro Amor eyeliner: Deep matte black. I don't know if it's me, but I feel like this is less black than the eyeliner that came with my Sinner palette.

PACKAGING: While the metal case looks so much more elegant than the rubberized plastic packaging of the prior palettes, I'm not a fan of how the mirror doesn't stay up when the palette is open.  I was also concerned about the shadows breaking more easily because something about this packaging seems less sturdy, but I've been taking this everywhere with me, and so far so good!
PRICE: $35 for 8 shadows + eyeliner.

You don't have to take my word for it, the Saint palette is available now at Sephora.

Review: Kat Von D True Romance Pigment in Conquer


Hi! Hope everyone  had  a good  holiday.  Did anyone shop the sales over the weekend? I shopped a little before Thanksgiving and picked up the other KvD pigment exclusive to the Sephora inside JC Penney. The shade, called Conquer, is a metallic light yellow green with a yellow gold sparkle.

This pigment is another hit for for me.  It applies smoothly and evenly, and I think it looks just as good wet as it does dry. The texture of this is as good as Meditation, but I haven't worn it yet so I can't speak of the fallout factor.  Then again, I always wear eye primer so I rarely have fallout problems throughout the day.


Left- swatched dry Right- swatched wet

When I first laid eyes upon this, I thought it was too similar to "Dimebag" from the Ludwig palette, but Conquer is definitely warmer and has more of a metallic finish.
Left- Dimebag. See how much cooler-toned it is? (natural lighting)

Dime bag (l) and Conquer (r) in indoor lighting

You don't have to take my word for it-- it's available now exclusively in Sephora inside JC Penney.

November 16, 2011

Review: Nails Inc. Magnetic polish

Recently I was in my 2nd home, Sephora, and the nails Inc. Magnetic polishes that i've been dying to try were out! I only meant to test it on one nail, but was so impressed i had to do all ten digits right then and there. Unfortunately my computer is broken, so I can't show you guys the results, but trust me-- this stuff is amazing. The color I have on is Trafalgar Square, a metallic gunmetal grey. It's pretty enough on it's own, but after it's gotten the magnetic treatment it gets these lovely black stripes. If that's not enough, the design is lenticular! (the design appears to travel when you move your nail back and forth. In other words, THIS GIVES YOU NAILS FROM THE FUTURE.) Although I can't show pictures right now, this is one of those rare products that looks exactly as it does in its advertisements. As for wear, without a top coat, it chipped within the first few hours. I applied a top coat later, and now am four days into the manicure with minor wear at the tips. How does it work? There are magnetic particles in the polish that react when a magnet is held over the wet nail. It works best when two coats were applied-- a thin first coat followed by a thicker second coat. Then you hold the magnet over each nail for about 15 - 20 seconds et voila! Instant, easy, and awesome nail art. All in all, this nail polish rules. The effect is so cool, and it dries so fast that you won't spend forever painting your nails. It also comes in gold and a smoky greyed purple if you're not to keen on the grey. I guess the only Thing that could be annoying for some is that when painting the second coat, you have to put the magnet on immediately after you paint the nail or the striations won't occur. You don't have to take my word for it, it's available now at Sephora.

October 21, 2011

Amazing find: Batiste Colored Dry Shampoo

Dear fellow black hair havers,
Is it just me or are we largely ignored by dry shampoo manufacturers?  The only black dry shampoo *I* knew of is the Bumble and Bumble hair powder, which is good, but it's SUPER expensive!! It generally retails for $25-$35-- even the tiny travel size is around $19.

 I've been looking for a cheaper alternative for a while, and have FINALLY found one at my local beauty store.  It's the Colored Dry Shampoo by Batiste.  I've used the regular Batiste dry shampoo before-- it was all right.  The smell was nice and it didn't make my hair really white like other brands have.   So finding this is black made me a very excited. And the price? LESS THAN $8!!! AWESOME!  How does Batiste CDS compare to the Bumble and Bumble hair powder? It's not a it's a much lighter texture than B&B, which I love.  With the B&B HP, I sometimes had trouble styling my hair after spraying it in because everything would get super dry and annoying. If you're like me and either A. have an oily scalp or B. dye your hair black and sometimes need to cover your roots in a flash, then you will fall in love with this.

I couldn't find a direct link for you guys if you were interested in picking up a can--sorry:( Be on the lookout for wherever Batiste is sold near you!

If you have a favorite black dry shampoo-- let me know in the comments!


Look of the day: Low-key (NOT)

Hi!  Do you ever have one of those days that you don't want to fuss over your look too much, then accidentally find something fun to play with?  That was me today. I was trying to get ready fast so i could go to the drugstore in my neighborhood, but then I found my Urban Decay Urban Ammo palette.   It's a really awesome little collection of colors-- some glitters, all shimmers, all great quality.  So here is today's look:
This is my cover of Vogue lolzzz


On my eyes:
Urban Decay Primer Potion (original)
Crease/outer corner: Last Call (shimmering medium burgundy)
Lid: Grifter (shimmering pink-lavender with silver glitter)
Lower lash line: Chopper (shimmering light bronze with silver glitter)
Highlights: Sin (shimmering pink champagne)
Eyebrows: Lucifer by Kat Von D (matte black)
#11 liquid eyeliner (sparkley burgundy) by Make Up Forever
Lush lash mascara by Urban Decay

On my face:
Tattoo concealer in Porcelain and Light by Kat Von D
L'Oreal True Match foundation in W1
Make Up Forever HD Powder
Pink Swoon Blush by MAC

On my Lips:
Rush (glossy pinky lavendery nude) lipstick by Urban Decay

Oh yeah if you're interested on how I did my 40's faux bangs, I learned from this awesome video by none other than Miss Fleur de Guerre.

What do you do for a low-key (or not) look? Let me know in the comments!

October 13, 2011

Skincare PATIENCE!

Dear readers,
Hopefully it's been ingrained in your heads how important it is to take care of your skin, no matter how old you are or what your skin type is.  If your skin acts like your enemy, as mine does to me, I know how it feels to pick up a product that's supposed to promise the moon and the stars, and does nothing of the sort.  This begins my story with retinol.

What's retinol? It's form of Vitamin A, which increases cell turnover.  It's often used in anti-aging products, and all the horrible (awesome) beauty mags I read are always saying "USE RETINOL WHEN YOU'RE IN YOUR 20s SO YOU DON'T LOOK LIKE A WRINKLED SACK OF DOODY LATER IN LIFE!!!"  I first started using it because it came in this acne kit.  It helped my acne heal and my scars fade, but I eventually got lazy and stopped using it.  When I switched to a different products, the terrible acne cycle began.  A few months ago, I was getting a little desperate and looked into laser treatment for scar removal for my face-- the quote I got was $1600.  Per treatment. According to the dermatologist I saw, she said I'd need three.

After the meeting, I dug out another OTC retinol product I had and started using it religiously every night (retinol breaks down in sunlight, so if you want it to work, you have to use it at night).  It's been about two months, and I definitely see a difference, not only in how my scars have faded, but also how much the texture of my skin has improved.

You may recognize from my Urban Defense review, taken a few months ago.

Right side- sad panda:(

This was taken this morning:
Right and left sides

Obviously my face didn't magically get perfect over night, but the difference is noticeable. So I guess this post is to encourage you to not give up! If you're like me, and using something to fix a problem, don't expect it to work overnight! Have patience! If your your routine is just to delay the inevitable, then congratulations to your future of being a hot senior citizen- keep up the good work!

October 7, 2011

WANT: Hello Kitty first aid kit

A poorly kept secret is that I manage to hurt myself all the time. It sucks. Maybe it's a special talent I should put on my resume? Another poorly kept secret is that I LOVE adorable things.  I'm not psycho-obsessed with Hello Kitty as some people are (which is kind of awesome- their obsession, that is), but I just came across this HK first aid kit, and I think I must own it.  How cute is that?!  At under $11 it's decently priced, and it's a 73 piece kit, so it will last me about.......... a week.

If you must own it too, it's available at Target.

Do you love any adorable/functional things? Let me know in the comments!

Review: Sally Hansen Nail Effects

These things have been around for a while now, and have gotten the seal of approval from some lovely friends of mine (hi Carolina! hi Jenn!), but I never picked them up until last week. While there are a few designs in the permanent collection that are really lovely, I kind of flipped for the Halloween designs.  My favorite designs were silvery spider webs, and red fishnets.  I went with the red fishnets because I think i can paint spider webs on my nails with the tools I already own.

The instructions were easy enough, and the kit included everything one needs to apply the stickers (mini nail file, wooden cuticle pusher). My only qualm was the little wooden cuticle pusher-- it kind of made my cuticles ragged. Next time I've just going to use my cuticle remover.  The only thing I didn't do well enough was stretching these to fit my nail beds, so on some of them there is a smidge of bare nail on the sides.  Not a big deal-- just something I'll know for next time.

While I love that there is zero drying time with these, what really impressed me was the wear time.  So far I've been wearing them for 9 days, and they're still going pretty strong!

9 days in!

I do have chips, but only on my thumbnails. The right thumb had an accident when I was cutting veggies for dinner, and the left got chipped because I was using it as a tool to pry something open.  Had  my nails not been abused, I'm sure they'd still be blemish-free.  PS: In case you're wondering, there isn't a topcoat on these babies, so the shine and sturdiness of the stickers isn't due to an outside product.

Left thumb, right thumb.
(no my right thumb isn't actually freakishly bigger than my left.  sorry to disappoint.)

All in all, I'd highly recommend these if you're into nail art but can't afford to go to a salon, if your art skills are lacking, or just want a quick polish job but don't have the time to wait for anything to dry.  These come in a variety of designs, and some solid colors too.  (Sally Hansen also makes nail stickers in a really sheer pink color, but they're not called Nail Effects, and they come in different packaging.  I noticed them with the bottles of top coats; etc. so if you're into something more natural, you may want to seek those out! Sorry I didn't remember the name of these)  I personally wish they would come in classic red for when my nails are a wreck and I suddenly have to look presentable for something.

Check your local drugstore for these, especially if you're interested in the Halloween designs! Actually, my Duane Reade had the "Holiday" designs out too. THEY ARE AWESOME! More about them another time.

Have any questions or comments? Feel free to post them below!